It's very true that a good digital camera makes it much easier to get good shots (put another way, you'll get fewer real stinkers!) ... but to get very, very good shots with a digital, you do need to know a bit about photography itself. A little theory goes a long way.
It's also very true that a good photographer will get better images from a poor camera than a poor photographer will get out of a good camera. And when you're thinking about laying down maybe $250 to $750 for a digital which is not even an SLR (they're a lot more expensive), you owe it to yourself to do your "due diligence" beforehand.
Yesterday I talked about a couple of cameras which I would recommend ahead of the rest for folks who don't want to go the whole hog and drop thousands on full-professional gear. After years as a professional photographer, I took the switch to digital as a mixed blessing. It's cheaper to take pictures, because you save to flashcards, not film ... but the cameras are much more expensive. And when you're used to having 100% control over every little thing in the camera (I'd used a couple of Pentax K-1000s, plus an Olympus OM-10 and a wide selection of lenses that fit all three bodies, for a loooooong time), well, digital cameras can be infuriating. You'll be paging through menus and beeping your way through lists of lists, to change settings, for godsakes -- by the time you get the bloody thing set, the kangaroo has hopped off, the fullback is at the other end of the field, the goalie has not only headed the ball out, but he's dropkicked it into the other end penalty box, the Ferarri is two states away ... the flying saucers are back on Mars. Right?
Okay, that's the ultimate downside of ANY digital, and as someone recently said, "Deal with it." It's a fact of digital life, and ain't gonna change any time soon. So, get your head around clicking and beeping your way through pages and menus, and ...
Take a closer look at the theory of photography, as it applies to digital cameras.
I'm uploading a number of photos here, each (hopefully) illustrating some point, as well as being a damned nice, and/or interesting photo. Click on each to get a larger view. All these images were captured with the Fuji FinePix S6500fd, at six megapixel resolution. Wish I could show you images by the Panasonic Lumix, but alas -- no can do at this point. Maybe later.
The first thing you want to look at is "normal conditions" ...
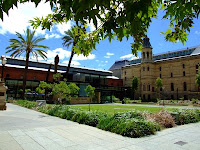 Bright, sunny day and no zoom to speak of. Auto exposure and manual focus. Around noon, so there's no wide shadow areas to contend with. This is the raw image, no enhancement. (Summer, 2008; the South Australian Museum of Natural History).
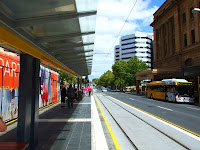 Same day, but much more difficult lighting conditions. Auto focus and auto exposure here, with the photographer standing in deep, deep shade at the tram stop, shooting out into sunlight that was extremely bright. Notice that the camera's auto exposure mechanism is able to capture good detail in both bright and darker areas. (North Terrace tram stop, end of the line, opposite the casino.)
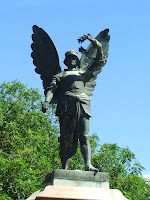 The war memorial in Angaston, in the Barossa ... in eye-destroyingly bright conditions. Sun is on the shoulder, so you get a good blue sky, though not quite the rich, dark blue you'd get with a polarizing filter on an optical camera. Don't fret about not being able to polarize efficiently with a digital: you can get the same effects with software, when you get home. Auto exposure, manual focus. (Summer of 2007.)
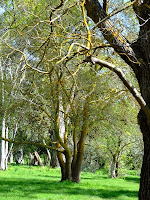 A bright sunny noon in mid-spring. Good sunlight but not too bright, with the camera position in patchy shade and very difficult lighting conditions right ahead -- patches of light and dark. The camera made a good job of averaging the whole thing. Manual focus keeps a tight, sharp image. (Belair National Park, South Australia).
The next thing you're thinking about is the quality of the zoom...
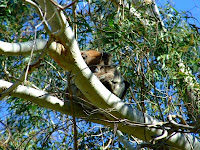 Top of the optical zoom -- no digital zoom here. Koala asleep in a tree, in extremely bright light. The tree was actually moving quite a lot in a decent breeze, but the virtual shutter and aperture were small enough to stop it completely. Auto exposure on this one -- manual focus. On auto focus, the camera repeatedly focused on the bough slightly in front of the koala, and the bear was fuzzy, out of focus. (Belair National Park, spring/summer.)
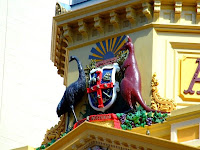 Again, top of the optical zoom, no digital zoom. The Australian coat of arms, crest, national insignia, whatever you want to term it ... very good lighting conditions, bright sunlight, but shooting close to the sun. Notice the whited-out sky. The sun is close to overhead in this picture, and I'm impressed with the detail and color the camera captured. A government building on North Terrancem Adelaide, S.A.
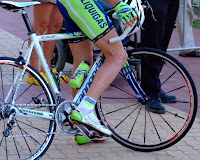 Top of the optical zoom. A close shot of a pair of million dollar legs. (High wow factor there...) Lighting conditions were not so brilliant; late afternoon shadows in the lee of a massive building. The camera kept great focus and color -- everything on auto in this picture. (The Tour Downunder, at Glenelg, 2008.)
The next thing on your minds is, "Okay, what about the digital zoom?"
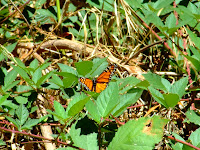 Top of the digital zoom ... a butterfly in the brambles, quite a long way off -- and this is the whole frame, not a crop from the middle of it. Very good lighting conditions -- good and bright, but not too bright (which can be a problem in Australia). Good color and not too much noise in the image ... but this is a photo captured in good light. As a rule of thumb, the lower the light, the worse your digital zoom shots will become. (Morialta Falls, South Australia.)
 Camera doing duty as telescope! Maximum digital zoom -- and manual exposure as well as manual focus. Without manual control, your chances of getting a digital camera to give you a great moon photo are not so good. You can see quite a lot of noise (grain) in this shot, but it's not too bad at all, when you think about what the camera was asked to do! (Shot from the backyard.)
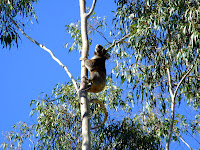 Close to the top of the digital zoom, but in perfect lighting conditions. The picture shows a little noise, but nothing you'd complain bitterly about. This little guy was waaaaay off; the sun is on the shoulder -- the bear is actually in a tiny patch of shade cast by the canopy of the next tree ... and the trees were swaying about massively in a very lively wind. Such shots are pot luck -- but I did manually focus him. Auto exposure. (Belair, 2008.)
Having looked at telephoto, you're thinking, "what about closeup shots?"
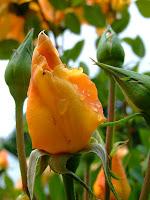 This one is a telephoto closeup -- stand way back and zoom on your subject, and tweak the focus manually. Auto exposure -- and somewhat difficult light. It's been raining ... it's about to rain again. (Handorf, South Australia, 2008.)
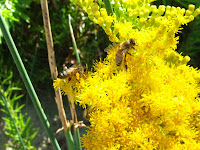 If you can actually get close to your subject, the camera does quite well. The minimum lens-to-subject distance is about 8", so you can just get in close, before you even start to look at macro work. However, focus is a bitch when you get in close. If you didn't have the option of manual focus, you'd be sunk. (Wellington, Murray River, S.A.)
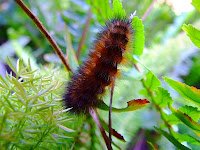 To get closer yet, go to the macro setting ... again, you'll want to use manual focus, though the auto exposure is very reliable on macro shots. If you need to get still closer...
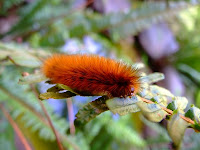 The 6500 has a super-macro setting, too. You can virtually sit the lens right on top of your subject. It's inclined to pop the flash when you're this close, so be sure to deliberately turn OFF the flash. Also, in super-macro, manual focus is prerequisite ... I don't think I ever got an auto focus on this setting. Fortunately, manual focus is just too easy.
So, you're thinking, what about poor lighting conditions...?
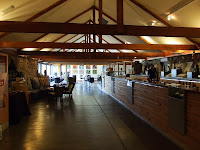 It was almost dark in here -- a Barossa winery open for tastings. The same rules apply here as with optical: you'll have to hold the camera VERY still, or mount/sit it on something, to avoid shake and blur. Also, the camera is inclined to set the virtual film speed sky-high, if you leave it on automatic. The higher the ISO ratings, the more noise (grain) you'll get. Take control: set your film speed (which sounds Irish, I know), and practise your "nitro fingers."
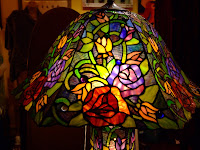
The light is almost nonexistent ... the shot was an experiment, to see what the camera could make of a Tiffany lampshade in a gift store in Handorf, SA ... the results are great. Auto exposure ... I think I used manual focus, though I couldn't swear to it.
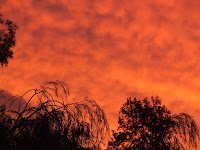 Here's the ultimate headache: get the camera to stop adjusting the exposure, and "correcting" your sunset shots back into normal daylight! Take it OFF the auto exposure setting, and but it onto the "N" (for normal) setting. Then, the camera records exactly what it sees, without getting smart. Also, set your ISO rate in 100 or 200, and do the "nitro fingers" thing again. Shot from the backyard.
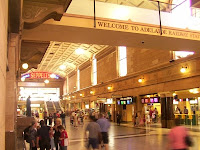 Very nasty lighting conditions. It's actually quite dark in the Adelaide Railway Station ... as witness, the blur on the folks going by. The camera is on auto, and captures the color extremely well; focus is very sharp, but you're susceptible to shake and blur, so hang onto it.
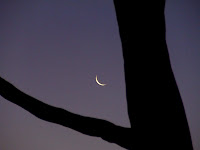 The camera is sitting on the top rail of the balcony, or this shot would not have been possible. Very late twilight ... manual focus on the crescent moon, manual exposure control too. Shot from the backyard.
So, just how far can you go with this manual focus thing?
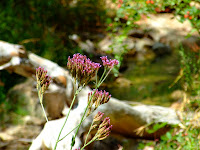 You can pretty much get back to the kind of shots you enjoyed with your optical SLR! This shot is an exercise in digital manual focus ... pick the wild flower out of a chaotic background ... and do it in a breeze, with the flower bouncing around. Auto exposure -- the lighting conditions were fair. (Morialta Falls, S.A.)
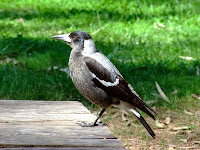 Same story: getting tack-sharp focus is difficult for even the best digital cameras. So don't leave it up to the mechanism: take control. Check out these feathers. (Juvenile Australian magpie; Belair National Park.)
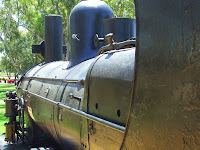 The absolute other side to the coin on focus is depth of field. That is, how much of the subject is in focus, as it slants away from the camera? The rule is, the smaller the aperture, the greater the depth of field. Take control: manual exposure. Small aperture gives depth of field -- with a loooong virtual shutter speed as the tradeoff. Hold the camera very steady ... the same rules apply as for optical cameras, you just find yourself clicking, paging and beeping through menus to get what you want! (Retired steam loco in a playground in Nuriutpa, Barossa, S.A.)
Cheers,
MK


3 comments:
Great post! keep up the good work!!
Regards,
SBL-Photo colorization Services
I agree that digital photographyis kind of magic..making beautiful images by clicking your camera..thanks for sharing ideas and i also love hose images you post..
sbl: thanks -- hope you get some visitors from the sig-line.
frankluna: many thanks for your kind words on my images. My one wish (and it'd take a time machine!) is that my Alaska pictures were digital. Alas, my work in the north was done in the late 1990s, before digital photography came of age. The best I can do for them is scan and enhance. I'm actually surprised by what you can do with digital enhancement, even though the raw image just came off a scanner.
Post a Comment